We are going to decode the IR Remote Control using the arduino and IR remote library. We can also decode any tv remote control. And use those tv remote control code in the arduino sketch to run any application. As we have seen, some devices are running using the ir remote. There is some kind of IR communication between the ir remote and the receiver devices who receive the ir signal. This is not the simple IR transmitter and receiver as we use in different robotics and embedded sensors.

The transmitter IR sends a frequency signal instead of a simple IR light. TV remote control or ir remote send the signal at long distance it sends the signal at some frequency like 38KHz.
At the receiver side, we use the IR receiver which is compatible to receive the frequency signal sent from the transmitter. If a signal is transmitted with a frequency of 38KHz then we need a receiver which is capable of receiving the signal of 38KHz.
Available TSOP with Different Carrier Frequencies
| TSOP | Frequency |
| TSOP1730 | 30KHz |
| TSOP1733 | 33KHz |
| TSOP1736 | 36KHz |
| TSOP1737 | 36.7 |
| TSOP1738 | 38KHz |
| TSOP1740 | 40KHz |
| TSOP1756 | 56KHz |
TSOP IR sensor receives a specific frequency signal as given in the table.
The TSOP1733 receiver will receive the only 33KHz signal.
Why use TSOP Based IR Receiver
The simple IR sensor gives false detection when using in presence of the sunlight. The signal sends from the normal IR led can not cover a long distance. TSOP is a complex IR sensor which can differentiate between the actual signal send from IR remote and the sunlight. The data bits at transmitter side are modulated at some frequency like 38KHz. TSOP receives it filter the noise and extract the original signal.
Table of Contents
TSOP1738 Pinout

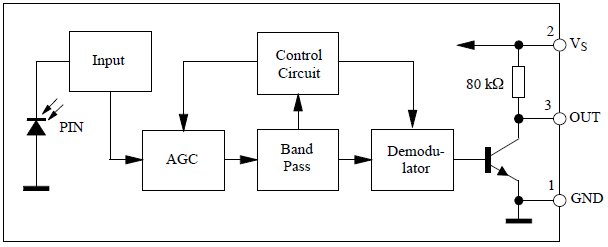
TSOP1738 Block Diagram
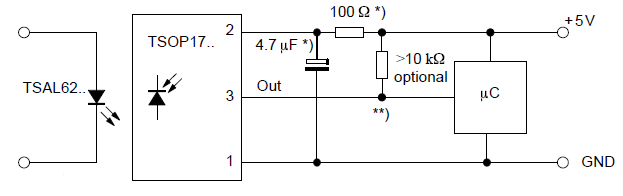
TSOP1738 Application Circuit
Download IR Remote Library and place in Arduino/libraries folder.
IR Remote Control Decoder Arduino Connection
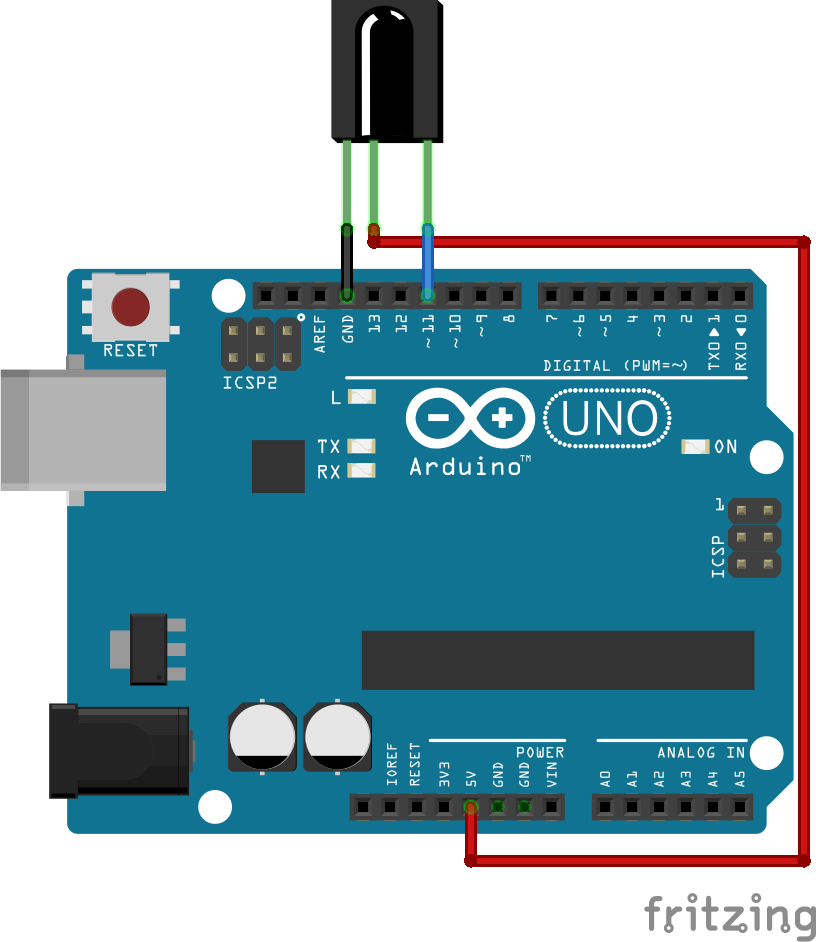
TSOP IR Remote Control Receiver Arduino Circuit
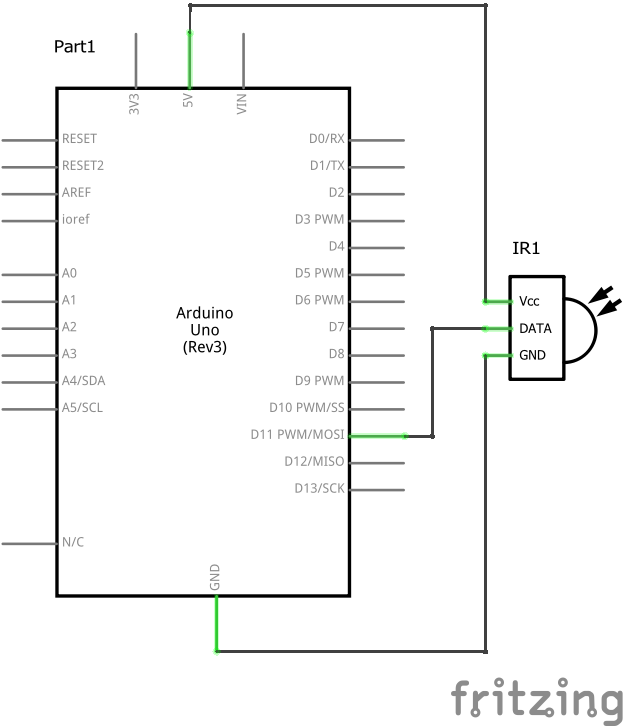
To decode the IR Remote Control we use the IRrecvDemo arduino sketch as given with the IR Remote Library. And connect the TSOP1738 to the arduino as given in the circuit.
IRrecvDemo.ino
/* IRremote:
IRrecvDemo - demonstrates receiving IR codes with IRrecv
An IR detector/demodulator must be connected to the input RECV_PIN.
Version 0.1 July, 2009
Copyright 2009 Ken Shirriff * http://arcfn.com
*/

#include <IRremote.h>

int RECV_PIN = 11;

IRrecv irrecv(RECV_PIN);

decode_results results;

void setup()
{
  Serial.begin(9600);
  irrecv.enableIRIn(); // Start the receiver
}

void loop() {
  if (irrecv.decode(&results)) {
    Serial.println(results.value, HEX);

    irrecv.resume(); // Receive the next value
  }
}
- Connect the output pin of TSOP1738 to Arduino digital pin 11 to get the decoded output
- Write the IRrecvDemo.ino sketch to the Arduino
- The open serial terminal at 9600 baud rate.
- Press the IR Remote button while pointing remote towards the IR Receiver
- You will see some hex value when pressing the button
- Note Down
- Repeat few times and make sure you are getting the same hex value for a single button.
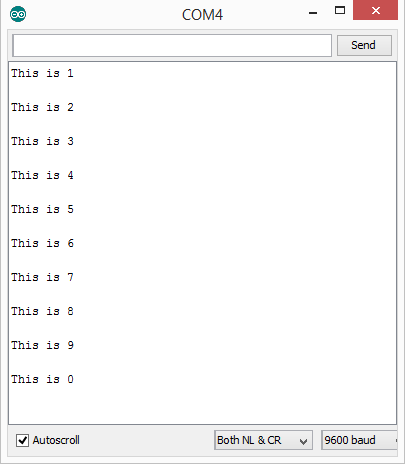
IR Remote Control Decoded Output at Arduino Serial Terminal

Here the hex value 1FE50AF is for button 1 and hex value 1FED827 is for button 2. So finally we decoded the button from 0-9 with all hex code given in the table below.
| Button | Hex Value |
| 0 | 0x1FEE01F |
| 1 | 0x1FE50AF |
| 2 | 0x1FED827 |
| 3 | 0x1FEF807 |
| 4 | 0x1FE30CF |
| 5 | 0x1FEB04F |
| 6 | 0x1FE708F |
| 7 | 0x1FE00FF |
| 8 | 0x1FEF00F |
| 9 | 0x1FE9867 |
Now use these codes in arduino sketch. When these codes match with the stored one do something. Here we have written the code that decodes the IR remote control button and shows the button number on the serial monitor.
Decoding_0-9_Buttons.ino
/* Decode the IR Remote Control signal and display
the button/key name on the serial monitor using the
IRremote: IRrecvDemo https://www.pjrc.com/teensy/td_libs_IRremote.html.
www.maxphi.com April, 2017
*/

#include <IRremote.h>

int RECV_PIN = 11;

IRrecv irrecv(RECV_PIN);

decode_results results;

void setup()
{
  Serial.begin(9600);
  irrecv.enableIRIn(); // Start the receiver
}

void loop() {
  if (irrecv.decode(&results)) {
   // Serial.println(results.value, HEX);    //showing decoded data on serial terminal

      switch(results.value)
      {
        case 0x1FE50AF:  Serial.println("This is 1"); break; // Button 1
        case 0x1FED827:  Serial.println("This is 2"); break; // Button 2
        case 0x1FEF807:  Serial.println("This is 3"); break; // Button 3
        case 0x1FE30CF:  Serial.println("This is 4"); break; // Button 4
        case 0x1FEB04F:  Serial.println("This is 5"); break; // Button 5
        case 0x1FE708F:  Serial.println("This is 6"); break; // Button 6
        case 0x1FE00FF:  Serial.println("This is 7"); break; // Button 7
        case 0x1FEF00F:  Serial.println("This is 8"); break; // Button 8
        case 0x1FE9867:  Serial.println("This is 9"); break; // Button 9
        case 0x1FEE01F:  Serial.println("This is 0"); break; // Button 0
      }
    irrecv.resume(); // Receive the next value
  }
}
So from the above sketch, we can decode the button from 0-9 and displayed their name on the arduino serial monitor.
So finally we have learned how to decode the IR remote signal using the Arduino. We can make different Arduino projects once we know the ir remote decoding.
In our next Arduino tutorial, you can learn