Controlling a robot car wirelessly is very interesting for a beginner or new in the robotics field. But the main question is how to make a robot car?. In this tutorial, we will cover how to make an android controlled robot car.
For this project, we have two sections. One is transmitter and second is a receiver. Here transmitter is an android phone and connected with the receiver robot using the bluetooth connection. Android phone already has inbuilt bluetooth. To connect to this android bluetooth, we are using one bluetooth module to the receiver side. We pair both the bluetooth module.
After pairing the android phone and robot, we use android application to control the receiver robot. We are using the Bluetooth Controller app to control the android robot. When a forward button is pressed ‘A’ is sent via this android bluetooth to the receiver bluetooth module. Same with other buttons. At the receiver, we write the code to accept the character ‘A’ and move the robot forward. Each button assigned a value, which is known by the receiver. And receiver takes action according to the value received.

Before using the app, we need to configure the application.
Table of Contents
How to Connect Bluetooth Module to the AVR
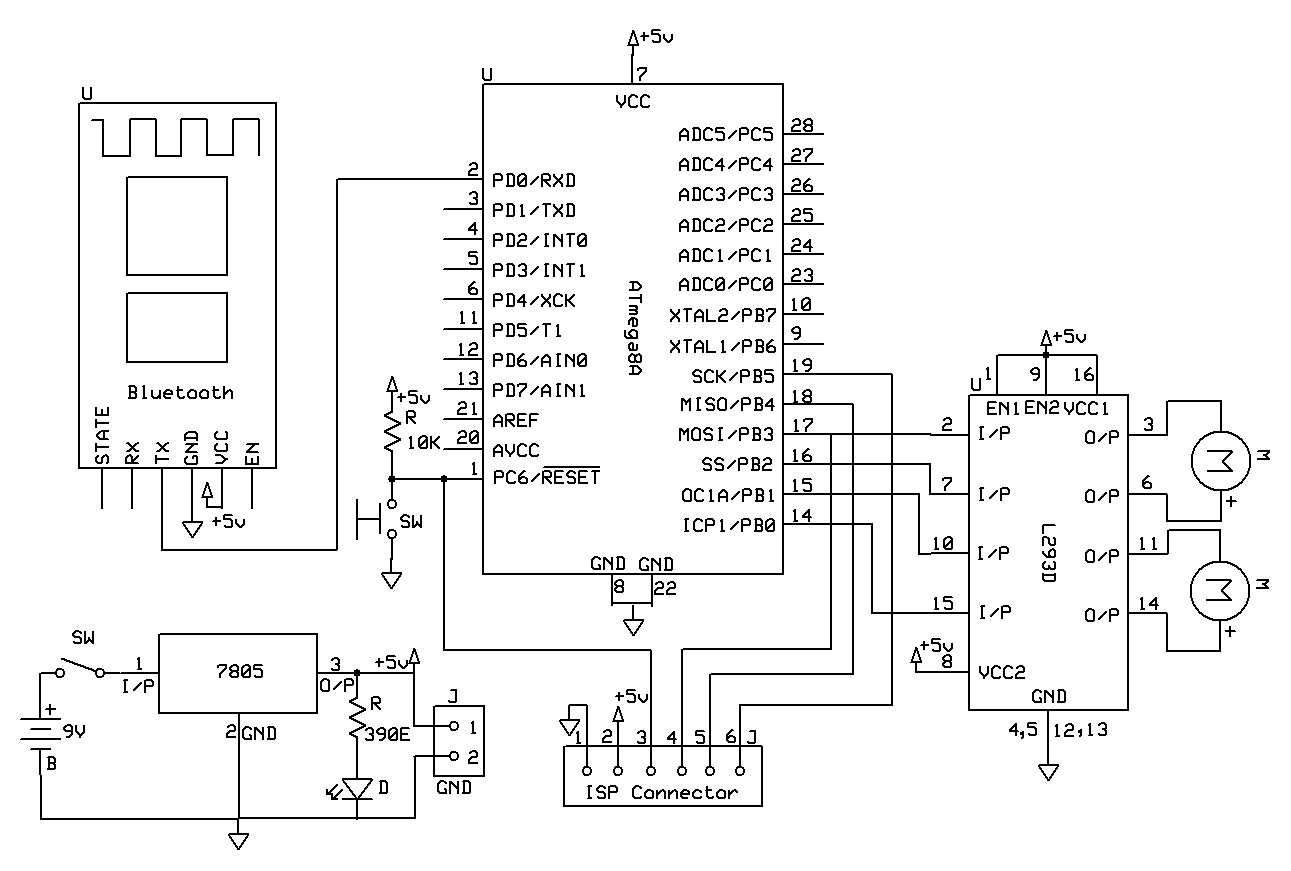
We have used HC-05 bluetooth module for this project. This module is connected with the atmega8. Both the module is connected using the serial communication. This android bluetooth robot using the serial communication to communicate with the bluetooth module and AVR ATmega8.
For an understanding of the serial communication, you can visit our tutorial Arduino Serial Communication Tutorial
Description

The hc-05 bluetooth module has six pins Vcc, GND, RX, TX, Key and State. By default, it comes as a slave device means it will only receive the signal can’t initiate a connection.But if you want to send something from this module then we need to change it to the master mode by applying some AT commands. If we are connecting HC 05 with the android phone we simply use it in Slave Mode. The default transfer rate will be 9600 baud rate. The HC-05 module has a factory set pin “1234” which is used for pairing to the phone.
HC 05 Bluetooth Pinout

Features
- Protocol: Bluetooth Specification v2.0+EDR
- Frequency: 2.4GHz ISM band
- Modulation: GFSK
- Emission power: ≤4dBm, Class 2
- Speed: Asynchronous: 2.1Mbps(Max) / 160 kbps, Synchronous: 1Mbps/1Mbps
- Sensitivity: ≤-84dBm at 0.1% BER
- Power supply: +3.3VDC 50mA
- Security: Authentication and encryption
- Working temperature: -20 ~ +75 Centigrade
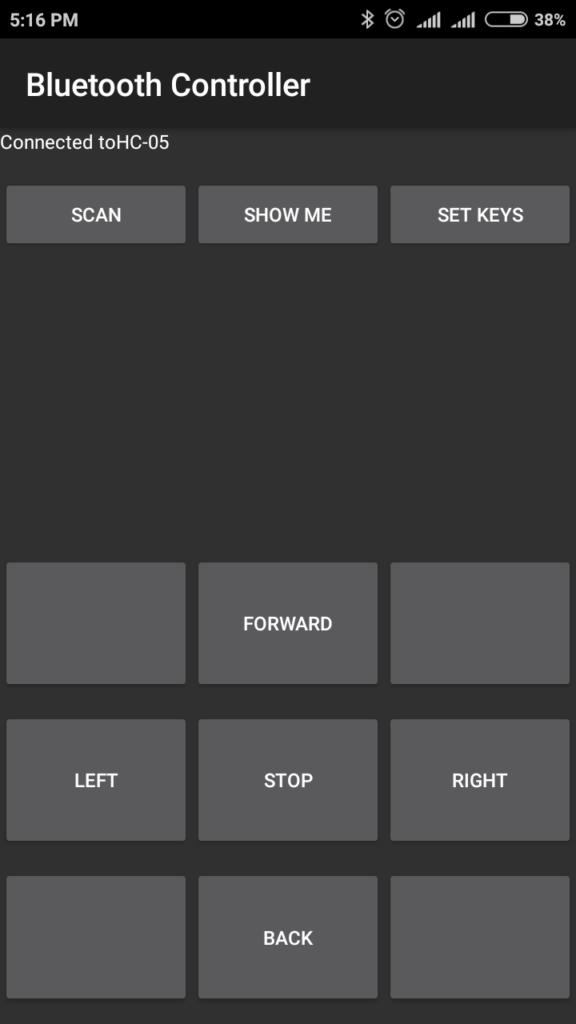
How to Configure Bluetooth Controller App
You can see easily that all the button is blank and we can give a text to this button according to our project.

So press button “SET KEYS”
A new window will open:
Key Name: Forward, Back, Left, Right and Stop => This is Button Text
Key Value: => A, B, C, D and E respectively, Now press OK.


Now connect the bluetooth module as shown above and then supply it. Pair the HC-05 device with the mobile. It is just like we pair the other mobiles. The passkey is “1234”. Once paired we can find it from the bluetooth controller app by pressing the button “SCAN”.

And it’s Done! Now we write the code to AVR that will control the robot by accepting the value A, B, C, D, and E.
Bluetooth Controlled Robot Circuit

Bluetooth Controlled Robot AVR Microcontroller Code
#include <avr/io.h>
#include <inttypes.h>
#include <util/delay.h>
#include <avr/interrupt.h>
//This function is used to initialize the USART
//at a given UBRR value
char buffer[10];
void USARTInit(uint16_t ubrr_value)
{
//Set Baud rate
UBRRL = ubrr_value;
UBRRH = (ubrr_value>>8);
UCSRC=(1<<URSEL)|(3<<UCSZ0);
//Enable The receiver and transmitter
UCSRB=(1<<RXEN)|(1<<TXEN);
}
char USARTReadChar()
{
//Wait until a data is available
while(!(UCSRA & (1<<RXC)))
{
//Do nothing
}
return UDR;
}
void USARTWriteChar(char data)
{
while(!(UCSRA & (1<<UDRE)))
{
//Do nothing
}
UDR=data;
}
int main()
{
USARTInit(77);
DDRB=0b11111111;//Motor at PORTB
char data;
while(1)
{
data=USARTReadChar();
switch(data)
{
case ‘A’:PORTB=0b00001010; //Forward
break;
case ‘C’:PORTB=0b00001001; //Left
break;
case ‘D’:PORTB=0b00000110; //Right
break;
case ‘B’:PORTB=0b00000101; //Back
break;
case ‘E’:PORTB=0b00001111; //Stop
break;
}
}
return 0;
}

