In this tutorial, we are learning how to make remote control car using Arduino. A remote control car can be built using different wireless technology like IR remote, Bluetooth, RC control or wifi module.
This tutorial is for all who are looking for
- how to make RC car
- how to make a remote control car at home
- how to make a wireless remote control car at home
A radio controlled RC car has the different techniques to communicate with the robot car. But the common part in IR Remote controlled car and RC are both are wireless. And we are learning here how to make a wireless remote control car at home. And for that we need some basic components like arduino, ir receiver TSOP and robot car chassis.
Here we are building the remote controlled car using the simple IR remote or tv remote control. An IR remote control sends some modulated IR signal to the receiver. The receiver IR receives the signal and demodulates it. After demodulation and some noise filtering the input signal is extracted. The main issue here is how to decode tv IR remote control signals.
We use the arduino and TSOP IR sensor to decode the tv remote control. We need to follow some steps to decode the IR remote from the arduino. We have a complete explanation of how to hack tv remote control using the arduino in our arduino tutorial. How to Decode IR Remote Control Signals using arduino irremote library.
Go through the tutorial and find the hex code for the button of the tv remote control by which you want to control the remote control car.
In TV Remote Control Car Project, we are using the TSOP1738 sensor to receive the signal coming from the tv remote control or IR remote control. There are different variation available for TSOP sensor and they accept only a specific frequency signal coming from the IR remote.
Table of Contents
How to Make Remote Control Car using Arduino
After decoding the ir remote signal again the question comes in mind that how to make remote control car using arduino. We need some basic of how to control a dc motor with arduino. And how to control dc motor direction using arduino.
What should I know to make TV Remote Control Car Project
- Make sure you are able to decode the tv remote control or any ir remote control signals
- You know how to drive a dc motor using the arduino
Available TSOP with Different Carrier Frequencies
| TSOP | Frequency |
| TSOP1730 | 30KHz |
| TSOP1733 | 33KHz |
| TSOP1736 | 36KHz |
| TSOP1737 | 36.7 |
| TSOP1738 | 38KHz |
| TSOP1740 | 40KHz |
| TSOP1756 | 56KHz |
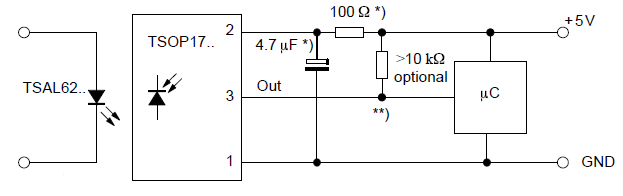
TSOP1738 Pinout

TSOP1738 Block Diagram
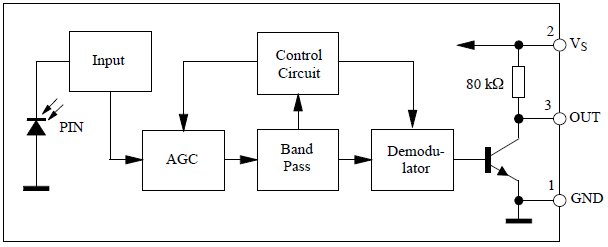
TSOP1738 Application Circuit
IR Remote Control Decoding Steps
- Connect the output pin of TSOP1738 to arduino digital pin 11 to get the tv remote signal or ir remote signal
- Download IR Remote Library and place in arduino/libraries folder.
- Write the IRrecvDemo.ino sketch to the arduino
- Open serial terminal at 9600 baud rate.
- Press the IR Remote button while pointing remote towards the IR Receiver
- You will see some hex value when pressing the button
- Note Down
- Repeat few times and make sure you are getting the same hex value for a single button press.
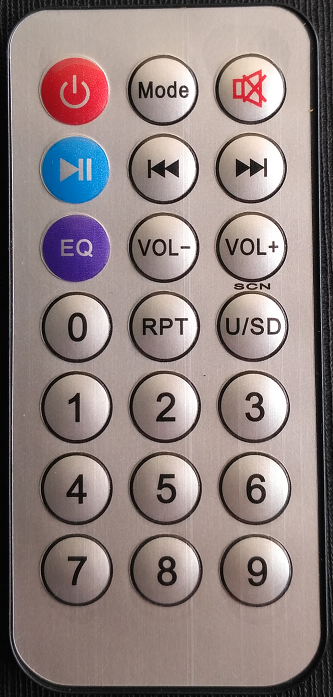
For the experimental purpose, we are using the simple cheap FM or DVD IR remote control available in the market.
IR Remote Control
IR Remote Control Decoder Arduino Connection
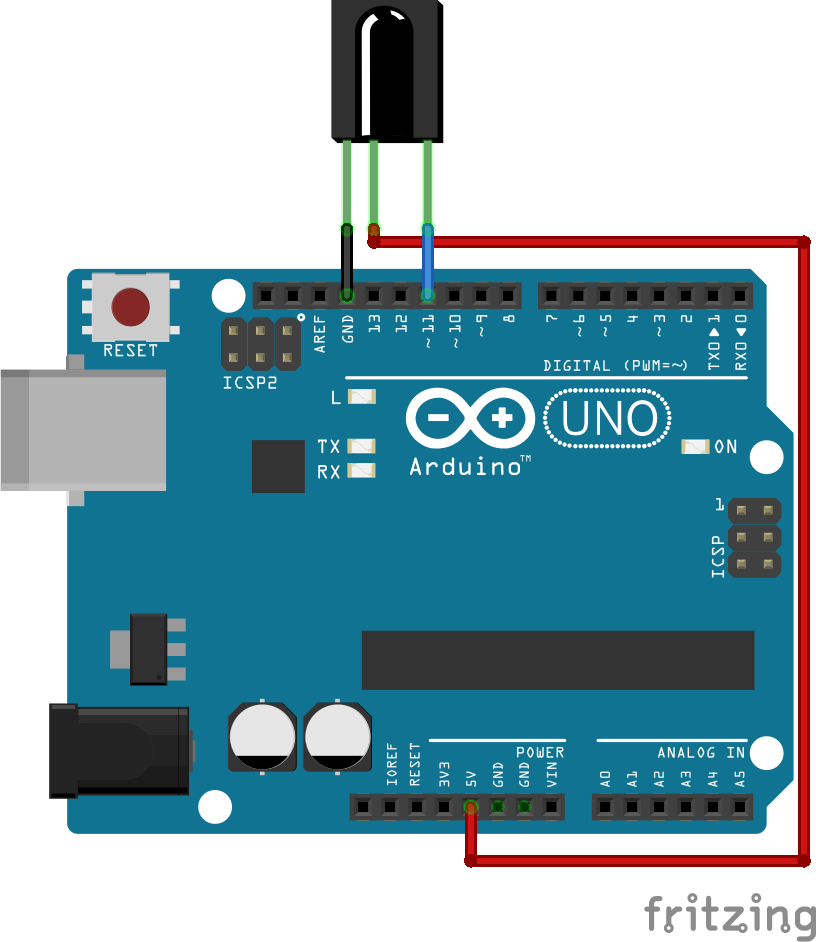
To decode the IR Remote Control we use the IRrecvDemo arduino sketch as given with the IR Remote Library. And connect the TSOP1738 to the arduino as given in the circuit.
I added one reference video from youtube.
IRrecvDemo.ino
/* IRremote:
IRrecvDemo - demonstrates receiving IR codes with IRrecv
An IR detector/demodulator must be connected to the input RECV_PIN.
Version 0.1 July, 2009
Copyright 2009 Ken Shirriff * http://arcfn.com
*/

#include <IRremote.h>

int RECV_PIN = 11;

IRrecv irrecv(RECV_PIN);

decode_results results;

void setup()
{
  Serial.begin(9600);
  irrecv.enableIRIn(); // Start the receiver
}

void loop() {
  if (irrecv.decode(&results)) {
    Serial.println(results.value, HEX);

    irrecv.resume(); // Receive the next value
  }
}
IR Remote Control Decoded Output at Arduino Serial Terminal
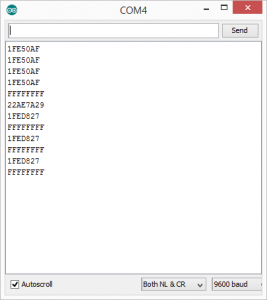
We decode the button from 0-9 using the IRrecvDemo.ino sketch. We have listed all the hex value of the in the table below.
| Button | Hex Value |
| 0 | 0x1FEE01F |
| 1 | 0x1FE50AF |
| 2 | 0x1FED827 |
| 3 | 0x1FEF807 |
| 4 | 0x1FE30CF |
| 5 | 0x1FEB04F |
| 6 | 0x1FE708F |
| 7 | 0x1FE00FF |
| 8 | 0x1FEF00F |
| 9 | 0x1FE9867 |
The same method will be used to decode the tv remote control or any ir remote control. But now onwards we are using the simple ir remote control decoded hex codes to run the remote control car.
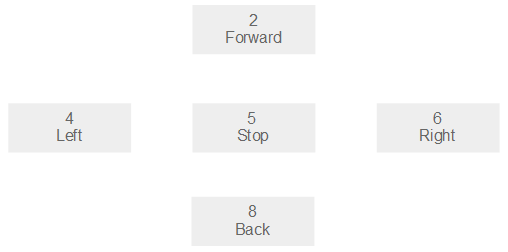
We have decided to control the remote control car using the five buttons of the ir remote control. When button 2, 4, 5, 6 and 8 is pressed the remote control car will move forward, Left, Stop, Right and Back respectively.
| Button | Action | Hex Codes |
| 2 | Forward | 0x1FED827 |
| 4 | Left | 0x1FE30CF |
| 5 | Stop | 0x1FEB04F |
| 6 | Right | 0x1FE708F |
| 8 | Back | 0x1FEF00F |
The above table showing, what action a remote control car will when we press the button. The table also showing their respective hex code that will be sent by the ir remote to the TSOP1738 connected to the arduino. We take all these hex codes and write the arduino code using it. When a button 2 is pressed arduino will receive the signal decode it and match from the table. If there is a match in the hex code. Arduino takes action and moves the remote control car accordingly.
And this configuration of the button will give the feel of a joystick. And the controlling of the remote control car will be very easy.
Write the arduino sketch to run the robot using the ir remote control.
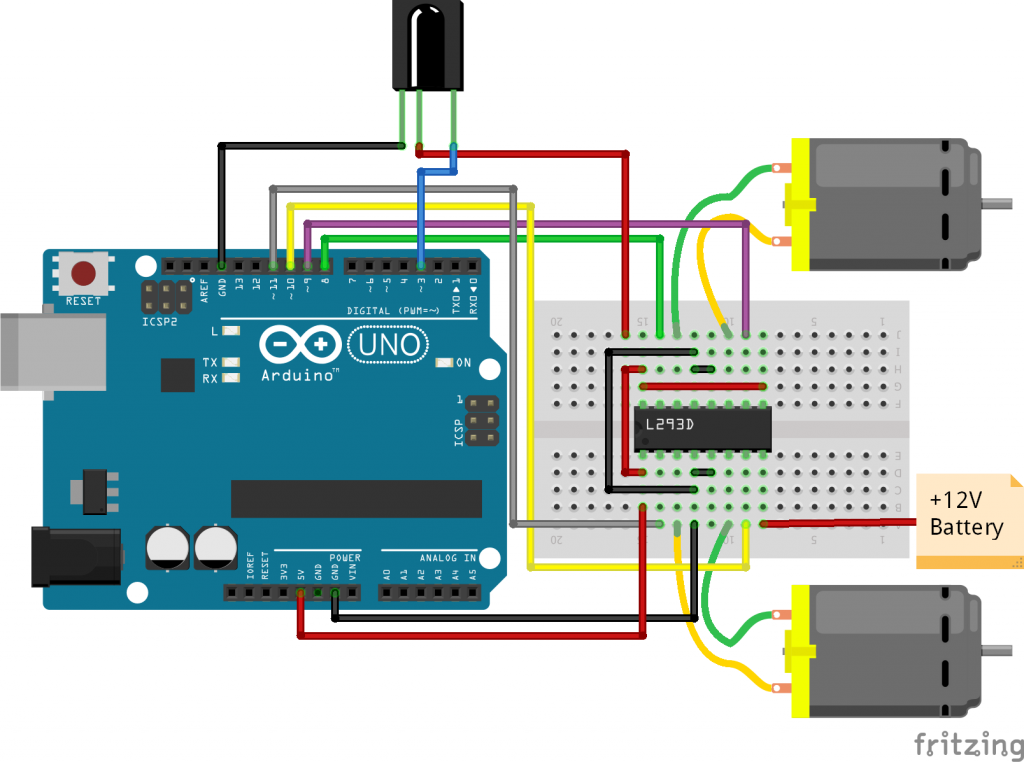
TV Remote Control Car Project Circuit
The remote control car circuit is given below. By making the circuit you can build a remote control car at home easily.
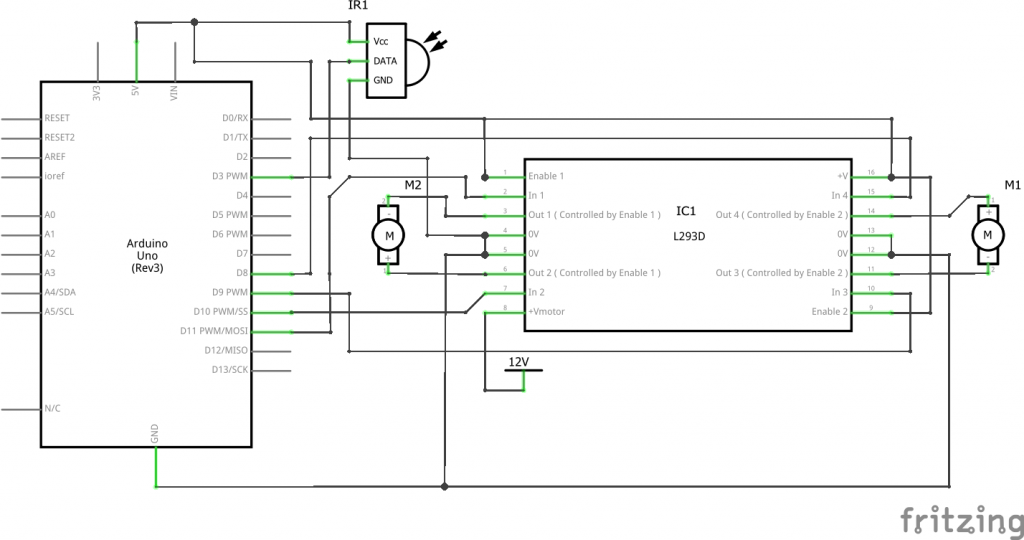
Circuit Connections
Digital Pin 3 – TSOP1738 output pin
Digital Pin 8 – L293D pin 15
Digital Pin 9 – L293D pin 10
Digital Pin 10 – L293D pin 7
Digital Pin 11 – L293D pin 2
TV-remote-control-car-using-ir-remote-control.ino
/*Arduino code for ir remote control car using the TSOP1738 ir sensor.
* Decode the button code, match and move robot according to button hex value.
* For deocoding the hex values we use IRremote: IRrecvDemo.ino sketch from
* https://www.pjrc.com/teensy/td_libs_IRremote.html.
* By www.maxphi.com
*/

#include <IRremote.h>
#include "pins_arduino.h"
int RECV_PIN = 3;//Pin should be PWM

IRrecv irrecv(RECV_PIN);

decode_results results;

void setup()
{
  irrecv.enableIRIn(); // Start the receiver
  pinMode(8,OUTPUT);
  pinMode(9,OUTPUT);
  pinMode(10,OUTPUT);
  pinMode(11,OUTPUT);
}
void loop() {
  if (irrecv.decode(&results)) {
      switch(results.value)
      {
        case 0x1FED827:  //Serial.println("Forward"); // Button 2
                         digitalWrite(8,LOW);
                         digitalWrite(9,HIGH);
                         digitalWrite(10,LOW);
                         digitalWrite(11,HIGH);
                         break;
        case 0x1FE30CF:  //Serial.println("Left"); // Button 4
                         digitalWrite(8,HIGH);
                         digitalWrite(9,LOW);
                         digitalWrite(10,LOW);
                         digitalWrite(11,HIGH);
                         break;
        case 0x1FEB04F:  //Serial.println("Stop"); // Button 5
                         digitalWrite(8,HIGH);
                         digitalWrite(9,HIGH);
                         digitalWrite(10,HIGH);
                         digitalWrite(11,HIGH);
                         break;
        case 0x1FE708F:  //Serial.println("Left"); // Button 6
                         digitalWrite(8,LOW);
                         digitalWrite(9,HIGH);
                         digitalWrite(10,HIGH);
                         digitalWrite(11,LOW);
                         break;
        case 0x1FEF00F:  //Serial.println("Right"); // Button 8
                         digitalWrite(8,HIGH);
                         digitalWrite(9,LOW);
                         digitalWrite(10,HIGH);
                         digitalWrite(11,LOW);
                         break;
      }
    irrecv.resume(); // Receive the next value
  }
}
We use some kind of motor driver IC like L293D to drive the dc motor. We hope that you know how to drive a dc motor using arduino. You can also visit our tutorial for this.
Do not copy and paste all the code as it is and assume it to work. Before writing the sketch make sure you have your own code to move your remote car forward, back, left, right and stop. Make a change in above code for all the motions. And the output pin of the TSOP1738 should be connected to any PWM pin. We have connected it to pin 3 that is a PWM pin in arduino uno.