This is an Arduino GPS tutorial interfacing the GPS module using the TinyGPS++ library. TinyGPS++ library provides good and easy to use a function to get position, date, time, altitude, speed, and course from user GPS devices. TinyGPS++ is the modified version of the older TinyGPS.
To install the library download it from the link. And unzip in the arduino library folder and restart the arduino ide.
Table of Contents
How to Interface GPS with Arduino Uno
We can use any GPS for Arduino that supports the UART protocol. So we connect the TX of the GPS to the RX of the arduino to get the serial data and display it.
The dedicated TX and RX pin are busy in communicating with the computer to download the code serially into the arduino and to display the serial data on a serial monitor. So to get the serial data from the GPS we used software serial of the arduino. We connected the TX pin of GPS to the digital pin 4 as RX pin. And 3.3V supply to the GPS module.
We have used the DeviceExample program from the TinyGPS++ library that appears after adding the library to the arduino ide. We run the DeviceExample Arduino program. But only this text appears on the serial monitor. No data like longitude, latitude, time or date.
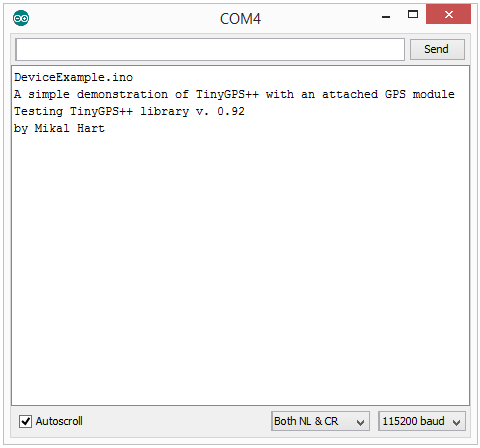
Then we changed in the program the baud rate from the 4800 to 9600 and it worked. Because most of the GPS module working on default 9600 baud rate.
static const uint32_t GPSBaud = 4800;
static const uint32_t GPSBaud = 9600;
The 9600 baud rate for communication between GPS and Arduino. The 115200 baud rate arduino uses to send the GPS data to the computer to display on the serial monitor.
Serial.begin(115200);
Now we get the expected result.
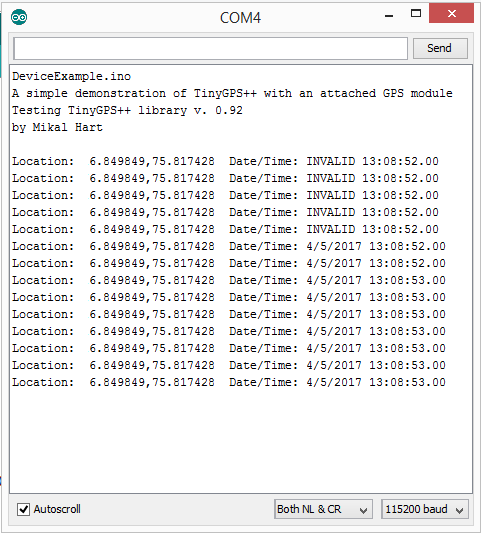
We are removing the function which displays the date and time. So finally we get the Latitude and Longitude of the location.

GPS Arduino Code Display on Serial Monitor
This arduino GPS code displays the latitude and longitude to the serial monitor of the arduino ide. This GPS code for arduino can be used in different GPS based tracking applications.
#include <TinyGPS++.h>
#include <SoftwareSerial.h>
/*This sample sketch demonstrates the normal use of a TinyGPS++ (TinyGPSPlus) object.
It requires the use of SoftwareSerial, and assumes that you have a 9600-baud serial
GPS device hooked up on pins 8(rx) and 9(tx).*/
static const int RXPin = 8, TXPin = 9;
static const uint32_t GPSBaud = 9600;

// The TinyGPS++ object
TinyGPSPlus gps;

// The serial connection to the GPS device
SoftwareSerial ss(RXPin, TXPin);

void setup()
{
  Serial.begin(115200);
  ss.begin(GPSBaud);

  Serial.println(F("DeviceExample.ino"));
  Serial.println(F("A simple demonstration of TinyGPS++ with an attached GPS module"));
  Serial.print(F("Testing TinyGPS++ library v. ")); Serial.println(TinyGPSPlus::libraryVersion());
  Serial.println(F("by Mikal Hart"));
  Serial.println(F("Edited By www.maxphi.com"));
  Serial.println();
}

void loop()
{
  // This sketch displays information every time a new sentence is correctly encoded.
  while (ss.available() > 0)
    if (gps.encode(ss.read()))
      displayInfo();

  if (millis() > 5000 && gps.charsProcessed() < 10)
  {
    Serial.println(F("No GPS detected: check wiring."));
    while(true);
  }
}

void displayInfo()
{
  Serial.print(F("Location: "));
  if (gps.location.isValid())
  {
    Serial.print(gps.location.lat(), 6);
    Serial.print(F(","));
    Serial.print(gps.location.lng(), 6);
  }
  else
  {
    Serial.print(F("INVALID"));
  }
  Serial.println();
}
How to Display Longitude and Latitude on LCD
To display Longitude and Latitude on LCD, learn how to interface lcd with arduino.
16×2 LCD and Arduino Connection
RS => digital pin 3
RW => GND
E => digital pin 2
D0-D3 => NC(Not Connected)
D4 => digital pin 4
D5 => digital pin 5
D6 => digital pin 6
D7 => digital pin 7
Now also use the connect from LCD to arduino as given in the program below.
Arduino GPS LCD Code
Arduino GPS LCD code displays the latitude and longitude to the 16×2 LCD.
/*Connection:
GPS TX : Digital Pin 8(RX
)## LCD Connection with Arduino ##
RS => digital pin 3
RW => GND
E  => digital pin 2
D0-D3 => NC(Not Connected)
D4 => digital pin 4
D5 => digital pin 5
D6 => digital pin 6
D7 => digital pin 7
*/
#include <TinyGPS++.h>
#include <SoftwareSerial.h>
#include <LiquidCrystal.h>

static const int RXPin = 8, TXPin = 9;
static const uint32_t GPSBaud = 9600;

// The TinyGPS++ object
TinyGPSPlus gps;

// The serial connection to the GPS device
SoftwareSerial ss(RXPin, TXPin);
LiquidCrystal lcd(3, 2, 4, 5, 6, 7);
void setup()
{
  lcd.begin(16, 2);
  Serial.begin(115200);
  ss.begin(GPSBaud);

  lcd.print("www.maxphi.com");
  delay(1000);
  lcd.clear();
}

void loop()
{
  // This sketch displays information every time a new sentence is correctly encoded.
  while (ss.available() > 0)
    if (gps.encode(ss.read()))
      displayInfo();

  if (millis() > 5000 && gps.charsProcessed() < 10)
  {
    lcd.print(F("No GPS detected"));
    while(true);
  }
}

void displayInfo()
{
  if (gps.location.isValid())
  {
    lcd.setCursor(0,0);
    lcd.print("Lat=");
    lcd.print(gps.location.lat(), 6);
    lcd.setCursor(0,1);
    lcd.print("Lng=");
    lcd.print(gps.location.lng(), 6);
  }
  else
  {
   lcd.print("INVALID");
  }
}
GPS Arduino Projects
After reading this arduino GPS tutorial, you can make different similar GPS projects.
- Arduino GPS Clock
- GPS based speedometer
- DIY GPS Tracked Bike Lock using Arduino
- Real-Time GPS Tracker with Integrated Google Maps
- Vehicle Accident Detection with GPS and GSM modem
- GPS based Vehicle theft detection system using GSM technology
- GPS tracker and alcohol detector with engine locking system using GSM
- Ambulance Tracking with Patient Health monitoring system using GPS and GSM